Welcome to the second part of my series on deployment pipelines. If you missed the intro, check out the video where I describe a typical pipeline here. You can find the other parts of this series, by checking out the tag ci-pipeline-series.

After the test phase of the pipeline, once the quality of the code has been checked, we must build a deployable artefact for this version (commit) of the code. In case of AWS, this would be an AMI (Amazon Machine Image), which can then be deployed as a new instance in our environment.
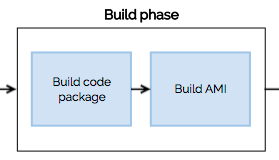
To build an AMI containing our code, we would usually follow two steps:
Build code package
Before creating an AMI, we need to create a package with our source code that we’d like to deploy. That means, we need to install all of the code’s dependencies and run any scripts that are required to generate any code, autoloaders, etc. For PHP projects, that would usually mean (at least) running:
composer --no-interaction --no-progress --optimize-autoloader --no-dev install
If you store any configuration files for system services (web server like nginx or apache, PHP-FPM configuration, boot script for the instance, etc), those need to be placed in the package as well. This package may take many forms - from a simple TAR archive, to an RPM/DEB file.
Building an AMI
This can be done in many different ways. I prefer to use Packer since it’s easy and versatile. When creating the AMI for deployment, you can take two main approaches:
- Create a full AMI from “scratch” (from an “empty” AMI of your system of choice)
- Have a “base AMI” pre-built and only upload your code package
Creating a full AMI from “scratch”
In this approach, you’d take an “empty” AMI (a basic AMI for your system, usually provided by the system’s vendor) each time you make a deployment and run a series of scripts (or preferably using an automation tool like Ansible or similar) that update the system, install required packages, update configuration files, etc. And upload and extract (or install in case of RPMs/DEBs) the code package - and create a new AMI.
Pros of this approach are:
- If you update the system each time, you’ll always have the most up-to-date packages
- No need to pre-create the AMI before deployment - simply take the AMI provided by the vendor and apply your changes
Cons:
- If your application is versions-sensitive (i.e. updating the system libraries ad-hoc and without tests can be a problem), this may be difficult to script.
- Updating the system from scratch each time, can take time - means your deployments take time
In short: it’s a nice approach to start with, as there’s less preparation required, but it can be costly in the long run, especially if you do many deployments per day.
Use pre-built “base” AMI
This approach divides the previous one into two steps: first we take the “empty” AMI and apply changes that are needed to run the code - update the system, install required services, optionally pre-configure them. The idea is to get the system to a state where all that’s needed is the actual code (and possibly simply changes, like starting a service). Create an AMI from that system, and use it as a base for each deployment. This whole action needs to happen before the deployment, not for each deployment. This can be done, for example, with Packer’s EBS builder. Then, during the deployment you can use Packer’s chroot builder to simply upload your code into the AMI, to create a “deployment AMI”.
Pros of this approach:
- More control over versions of system’s libraries and services
- Much shorter deployment time - just the time needed to upload the package and create a new AMI
Cons:
- Need to implement another process that creates the base AMI and update it regularly
- To use Packer’s chroot builder, the instance creating the AMI needs to run within AWS (not usually a big issue)
This approach is usually more widely adopted, as it shortens the deployment time and allows for more control. Once we have an AMI with our code create, we are ready to deploy!
That’s it for the build phase. Feel free to comment with any questions. Check back next week for details on third part of the pipeline – the acceptance tests. I’ll be focusing on deploying the created AMI into a test environment and running automated acceptance test.


